Welcome to a Linocut/Block Printing Tutorial.
Block Printing (Linocut/Rubber Stamp/Wood Block/etc.) is a fun and relatively low-cost way to make art.
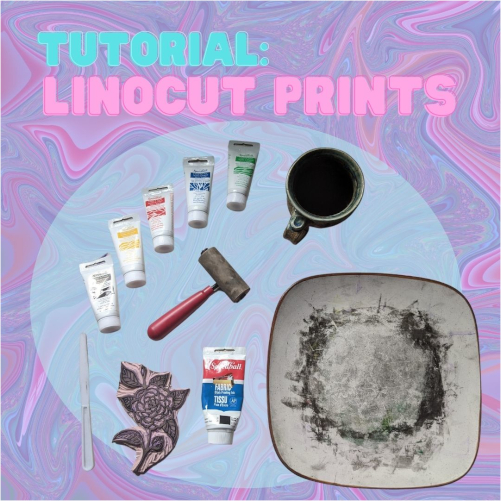
The Supplies you will need are:
– a design
– a block(or stamp) to carve
– carving tools
– print making ink
– brayer
– a heavy book/baren/press
– pen and pencil
– liquid ink/paint (not black)
– paper or fabric to print on
-ink plate (or a literal plate)
Step 1: Design
- First and foremost you will have to decide what you want to print. There are tons of free sources for images online that you can just print out, or you can design an image of your own.
- Make sure you mirror the image before printing your design! Once you have the design sketched out or printed, you will have to transfer it to the block. (If your design has text you will want to transfer it ‘mirrored” so that when you print it comes out legible.)
Step 2: Transfer
- Transfer the image by covering the back of the design with pencil. You want to give it a nice coat of graphite and then flip it over and trace your design onto your printing surface.
- Coat the printing surface in a thin layer of ink or watered down paint. This helps seal in your design and helps you see where you have carved.
Step 3: Carve
- Next carve out your design! I use Speedball Carving Tools, but wood carving tools too. Please make sure your tools are sharp and that you are always cutting away from yourself to avoid unwanted accidents.
- The carving stage can get pretty messy, be prepared to have lots of little pieces of stuff floating around. You won’t want those little pieces messing up your final work, so clean as you go.
Step 4: Test Printing / Rolling Out Ink
- Test Printing your design in the next and one of the most important parts of this process because it allows you to see if you have made any mistakes and if your design is ready to print or not.
- Roll out the ink by putting some ink onto your inkplate (I use a literal dinner plate) and then use your Brayer to roll it out into an even square.
- The consistency of the ink should have little mountain ridges in it.
- Next, roll the ink onto your stamp, place the stamp on a scrap piece of paper, and use the Baren (or heavy book) to press down onto the print.
- Pull up the stamp to reveal the print and make any final cuts to the stamp.
Step 5: Printing
- Once you have your stamp finalized its time to print the actual thing!
- There are a couple different ways that you can go about print making, but the goal is to coat the stamp evenly with ink and apply even pressure to distribute the ink onto the print surface.
- When I am printing on paper, I will usually measure out the area I want to print out on a sheet of paper. I trace the stamp and then secure the paper to a flat surface with tape. Next, I coat the stamp with ink and place it ink-side up into that area I traced out. Then, I place my paper on top of the stamp and use my baren or a heavy book to add pressure.
- When I am printing on fabric, I will usually do the opposite. I will put the inked stamp directly onto the fabric and apply pressure. I also put a flat surface between the layers of fabric so the ink doesn’t bleed through.
As far as what type of supplies to get, I would check your local re-use store or craft store, otherwise is easiest to find everything online.
If you have any questions leave me a message at: amy@SunshineBlossoms.us